Dunno in other version, but did this in v.2.49. I was trying to use 2 texture files on to a single surface, eg. money, where both side textures (or image) are different. In Maya, I could easily achieve that by using samplerInfo node and condition node. So if the facing ration from samplerInfo is true or the normals are facing outward the surfaces, the condition node will apply texture file A. But if the normals are facing inward the surfaces, the condition node will apply texture file B. That's one way to apply 2 textures on a single surface... in Maya.
Now in Blender... at last I know how to achieve that .. after walking in circle. One way to apply 2 different textures in a single surface is by using the shading node.
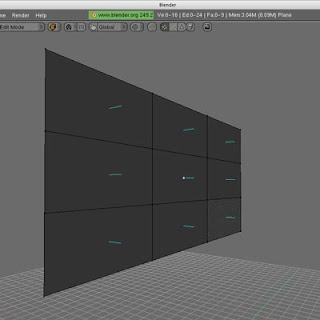
Here's the plane, subdivided, and displaying the surface normals (the blue line):

Apply new material, name the material, and apply 2 different texture files. We can see that by turning on/off one texture, the preview will update accordingly. If both are turned on, because both are mapped into color channel, and both are displayed in 100% opacity, so... only last texture file will be displayed in render preview.
- The 2 texture file:

- The rendered image:

As you can see, both sides are showing the same image, even though 2 texture files were used. Btw, I add twist modifier to the plane so we can see both side directly.
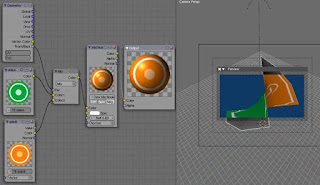
Now, lets open the node editor. Here's my shading node connection, and the render image:

Aha!... both sides are now showing both texture files.
Brief description from the node editor:
1. Connect the front/back from geometry node into the factor in mix node. I think the front/back wasn't there yet in previous version... but I might be wrong. I tried to find this attribute info in the net, but haven't found any. So I'm guessing maybe it has something to do with the surface side, guessing from it's name... and it werks like a charm. My first try was connecting normals into invert node and connect that to the mix factor... but then I realise, normal attribute in geometry node is more related to the "bump" of the surface. And it wasn't werks like a charm (^_^)...
2. Connect the texture A color output into mix color input 1
3. Connect tecture B cokor output into input in mix color 2
4. Connect ourput color from mix node into the input color of material node.
*** UPDATE 20 Nov 2009 ***
5. Forgot another important steps :). After setting up those shading node, dont forget to clear all the textures in texture panel (The texture panel like the one with sideA & sideB textures in image no 2 above), because all the textures are handled in nodes.
6. Also press the "Do Composite" before render.
7. Last but not least, if the object has been UV unwrapped, connect from geometry-UV output into each vector input of texture nodes for correct texture UV mapping.
After some experiment with this setting, I found that ray trace reflection will not work correctly. I think it's better to use this setup for objects with no ray trace reflection.
*** End UPDATE ***
During the journey of the searching ... I thought maybe by extruding a tiny bits amount of the surface then applying 2 different textures will work. Well it might work, but for some condition like a animating a cape with different texture on both sides... the extrude methods will give you more pain in the ass. Then again... somebody might have been found another better ways.
Till then... cheers.
Now in Blender... at last I know how to achieve that .. after walking in circle. One way to apply 2 different textures in a single surface is by using the shading node.
Here's the plane, subdivided, and displaying the surface normals (the blue line):

Apply new material, name the material, and apply 2 different texture files. We can see that by turning on/off one texture, the preview will update accordingly. If both are turned on, because both are mapped into color channel, and both are displayed in 100% opacity, so... only last texture file will be displayed in render preview.
- The 2 texture file:

- The rendered image:

As you can see, both sides are showing the same image, even though 2 texture files were used. Btw, I add twist modifier to the plane so we can see both side directly.
Now, lets open the node editor. Here's my shading node connection, and the render image:

Aha!... both sides are now showing both texture files.
Brief description from the node editor:
1. Connect the front/back from geometry node into the factor in mix node. I think the front/back wasn't there yet in previous version... but I might be wrong. I tried to find this attribute info in the net, but haven't found any. So I'm guessing maybe it has something to do with the surface side, guessing from it's name... and it werks like a charm. My first try was connecting normals into invert node and connect that to the mix factor... but then I realise, normal attribute in geometry node is more related to the "bump" of the surface. And it wasn't werks like a charm (^_^)...
2. Connect the texture A color output into mix color input 1
3. Connect tecture B cokor output into input in mix color 2
4. Connect ourput color from mix node into the input color of material node.
*** UPDATE 20 Nov 2009 ***
5. Forgot another important steps :). After setting up those shading node, dont forget to clear all the textures in texture panel (The texture panel like the one with sideA & sideB textures in image no 2 above), because all the textures are handled in nodes.
6. Also press the "Do Composite" before render.
7. Last but not least, if the object has been UV unwrapped, connect from geometry-UV output into each vector input of texture nodes for correct texture UV mapping.
After some experiment with this setting, I found that ray trace reflection will not work correctly. I think it's better to use this setup for objects with no ray trace reflection.
*** End UPDATE ***
During the journey of the searching ... I thought maybe by extruding a tiny bits amount of the surface then applying 2 different textures will work. Well it might work, but for some condition like a animating a cape with different texture on both sides... the extrude methods will give you more pain in the ass. Then again... somebody might have been found another better ways.
Till then... cheers.
Oh.. bisa gitu ya di blender? baru tau nih. lanjutkan!
BalasHapusThanks so much--you are the only person I have found online that knows this is possible!
BalasHapusUr welcome Jesse. Even though I think there are some ppl that already know about this but haven't post it online... maybe :)
BalasHapushey man first of all thanks a lot.
BalasHapusi have no problems until clearing the textures.... so i did everything including point 4.
im a noob thought. im using blender 2.61
i cant find the "clear texture" thing you tell in point5...
can you help ? thanks a ton
hey man first of all thanks a lot.
BalasHapusi have no problems until point 5clearing the textures.... im a noob thought. im using blender 2.61
can you help again ? got everything like you, including point 4. but from 4 to 5 i just dont get it
hey didnt realise someone still watching this thread.
BalasHapusAnyway point #4, in order to make this work, u need to un-check all the textures in the texture editor. Keep wathcing your node editor though. If the textures are somehow missing in the node editor after u uncheck them in texture editor, re-assign them in NODE EDITOR.
Hope that clear enough.
Sorry that's point #5
BalasHapus