An Overview on Digital Illustration Using Krita
Ok... so I've heard about Krita for quite sometime, but at that time I was still comfortable using Firealpaca. Not until I switch my OS to Elementary Loki. There is no linux version for Firealpaca (at this moment of writing), which in the end "force" me to switch and use other digital painting software that should be reliable in linux. And then this is where I remember about Krita, an open source painting program running in multiplatform operating systems. Next thing is I downloaded Krita and start using it for doing digital illustration works.
Coming from Firealpaca where there aren't so many settings like in Krita (brush engine), I was a little bit overwhelmed, but also amazed in the same time. To fill in the blanks, I watched some tutorials in youtube about Krita basic usage. But the best teacher to learn enything is to experience it, and try it out yourself, and so I did.
 |
| Krita Brush Presets |
 |
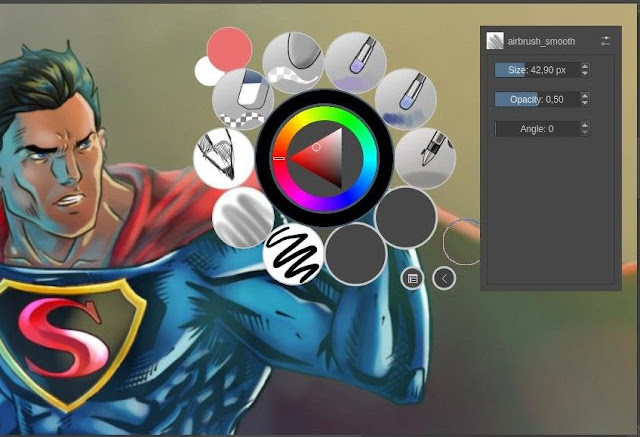
| Right Click Pop-up Menu |
This pop-up menu in Krita really helped me a lot to group together the brushes that I use the most, so that I didn't have to switch back and forth looking the brush I'm going to use from different groups. And also we can adjust the size and the opacity of the brush directly from this pop-up menu in Krita. The shorcuts for resizing and play with the brush size and opacity also available if you prefer to work with keyboard shortcuts as well.
 |
| Krita Brush Settings |
This is my custom brush settings in Krita. There are so many things in there, but just playing with few of them, I can get the brush that I'm looking for. The panel on the right is where we can create the thumbnail of the custom brush.
 |
| Krita Assistant Tool |
Now this is the best part for me. It's the Asisstant Tool!
With these tools, we can draw a smooth curvy lines or drawing perspective easily. As you can see, there are several Assistant Tool you can play with in Krita.
I tried my first digital illustration in Krita doing this classic Superman illustration. I had to try different brush settings on the way to fit with my liking. Here is the digital illustration I made in Krita first try:
 |
| Lineart in Krita |
 |
| Superman Fanart Digital Illustration in Krita |
I actually did two versions of Superman illustrations, the first one is the one with Man of Steel costume, second is from classic outfit. Not bad for my first try using Krita eh :)
I was thinking more on "how to do this" at first try when doing Superman digital illustration in Krita, rather than just "go with the flow" and paint, so I did another try doing digital illustration on this Ryu from Streetfighter. My second attempt was more "relaxed" because I did some customizations on Krita preference, and made me more comfortable using Krita. Here is my second digital illustration using Krita:
 |
| Rough Sketch in Krita |
The first step, I loosely draw the character with pencil brush in Krita just to get the overall idea of the illustration, the shape, proportion, etc.
 |
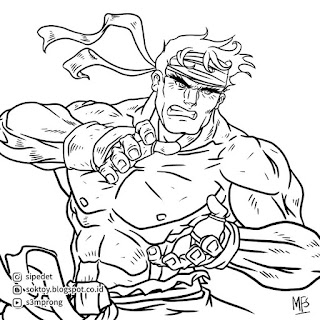
| Final Lineart in Krita |
When I'm happy with pose and proportion, I move on to do the lineart with layer on top of the rough sketch. And also tune down the rough sketch layer opacity so that I can see the smooth lineart progress.
 |
| Digital Coloring in Krita |
Lastly, just color the piece with different layers for each individual parts, for example layer for body color, layer for hair color, layer for belt color, and so on, so later on I can tweak individualy when I need to. When the coloring is done, I color the lineart with alpha lock on that layer switched on, so the color only apply within the lineart only. The result is we can see the lineart has different colors corresponds to the parts of the character, and not just black color outline.
In the end, I think I can move on doing my digital illustration using Krita, yet there is two things that got me in the head. First, Krita tends to show slow performance on using textured brush, especially in large canvas with high dpi like 2048px x 2048px 600dpi, probably (definitely) because of my PC (i3 3ghz with 4GB Ram). It created almost like 1gig cache file for both my digital illustration works. The work around with this, when I'm happy with my digital inking and coloring, I merge them into one layer, and resize the image size half. Then working from that file for polishing or adding some extra wow for the final digital illustration. And also, maybe it's time to do some major upgrading for my PC, and see how it goes with high dpi on large canvas.
Second, I definitely need to convert my other works that was done using Firealpaca to Krita, which is not a really big deal, but a bit tedious with so many files to work on with.
Anyways, in the mean time, maybe I'm going to share some video on digital illustration using Krita, like a timelapse, but after I feel more confident to do that in Krita. Right now, there are so much to learn with this piece of amazing software.

Komentar
Posting Komentar
Monggo komennya